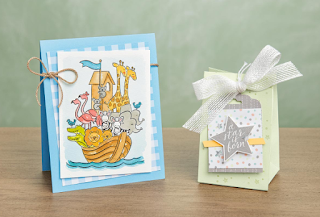
There are certain things you can count on always needing cards for: birthdays, babies and thank yous.
New babies are one of the most exciting things we ever get to see; they’re so cute with their round cheeks and ticklish toes. Thankfully, my shop has the perfect stamps to celebrate those tiny beings in just the right way.
ANIMALS CARD
4-1/4" x 5-1/2"
Perfectly Paired Stamp Set; Balmy Blue Cardstock;
Gingham Gala 6" x 6" Designer Series Paper; Watercolor
Paper; Balmy Blue, Flirty Flamingo, Granny Apple Green,
Mango Melody,So Saffron, Smoky Slate, and Soft
Suede Classic Stampin’ Pads; Jet Black StazOn Pad;
Nature’s Twine; Stampin’ Dimensionals; Aqua PaintersINSTRUCTIONS
1. Fold the Balmy Blue Cardstock to create the card.
2. Adhere a piece of Gingham Gala 6" x 6" (15.2 x 15.2 cm)
Designer Series Paper to the card front.
3. Tie a piece of Crumb Cake Nature’s Twine around the card
front and tie it in a bow.
4. Stamp the animals in the ark in Jet Black StazOn ink on a
piece of Watercolor Paper. Watercolor the images in Balmy
Blue, Flirty Flamingo, Granny Apple Green, Mango Melody,
So Saffron, Smoky Slate, and Soft Suede ink using Aqua
Painters.
5. Adhere the Watercolor Paper to the card using
Stampin’ Dimensionals.
A STAR IS BORN GIFT
Calligraphy Essentials Stamp Set; Calligraphy Essentials Project Kit; Blushing Bride and Pool Party Classic Stampin’ Pads; Coastal Cabana and Lovely Lipstick Stampin’ Write Markers; Stampin’ DimensionalsINSTRUCTIONS
1. Cut a bag from Soft Sea Foam Cardstock using the Gift Bag Punch Board. Stamp the stars and dots image in Soft Sea Foam ink several times on the front section on the bag. Assemble the bag.
2. Punch two holes in the top of the bag using the 1/8" (3.2 mm) Circle Punch.
3. Punch the top of a piece of Twinkle Twinkle Designer Series Paper using the Scalloped Tag Topper Punch. Adhere another pattern of the Designer Series Paper to the tag.
4. Adhere a strip of Daffodil Delight Cardstock to the tag.
5. Stamp the star sentiment in Gray Granite ink on a piece of Whisper White Cardstock. Cut it out and adhere it to the tag using Stampin’ Dimensionals. Adhere three Twinkle Adhesive-backed Sequins to the star and tag.
6. Thread Whisper White 5/8" (1.6 cm) Flax Ribbon through the holes of the bag and tie a bow.
7. Thread Whisper White Solid Baker’s Twine through the top of the tag and tie it to the bow. Adhere the tag in place on the bag using a Stampin’ Dimensional.
Find everything you need for this projecct here: https://www.stampinup.com/ecweb/default.aspx?dbwsdemoid=2190173

Comments
Post a Comment